Did you know you can create custom tasks on your Sage 500 menu? You can! Here’s a step-by-step guide on how to do so.
What kind of tasks can I add?
- Custom BIE (Business Insights Explorer view)
- Custom report (Crystal Report)
- Word, Excel, etc. document or shared folder
- Website URL
How do I create a custom task for a new BIE?
We’ll use the first option as our example. To create a custom task for a new BIE, you’ll first need to create the SQL View that will be the source for the BIE. In SSMS (SQL Server Management Studio), create the SQL View, and change the permissions on the view to give the ApplicationDBRole the ‘Select’ permission. You must also name the view starting with “vdv”, and the view name can be no longer than 25 characters.
Once you have the view ready in SQL, now it’s time to add the custom task in Sage. To do so, go to System Manager → Tools → Task Editor. At the Task List box, select “Add New Task”. You will get the following dialog box:
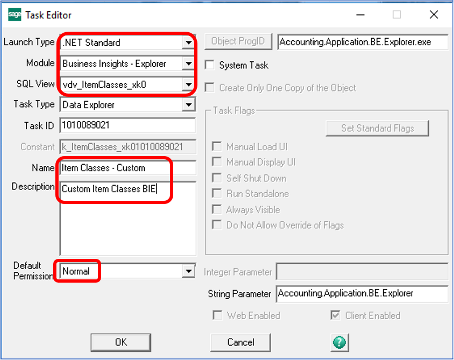
- Select Launch Type of “.NET Standard”.
- For Module, select “Business Insights – Explorer”.
- In the SQL View box, select your “vdv” SQL View name.
- Give your new task a user-friendly name in the “Name” box.
- Add a description in the associated box.
- Leave the Default Permission at “Normal”.
- Leave all other fields as they are.
- Click OK, and Close the Task List screen.
How do I get the task to show on my menu to launch it?
Next, we need to show your custom task on the menu. To do this, open the Module menu you’d like to add your task to, and drill down into the specific menu path you’d like to add your task under. Typically, BIEs would be added under Module → Insights → Explore. Right-click on the existing menu task that you would like to add your new task above, and select Create New Task → Sage 500 ERP Task:
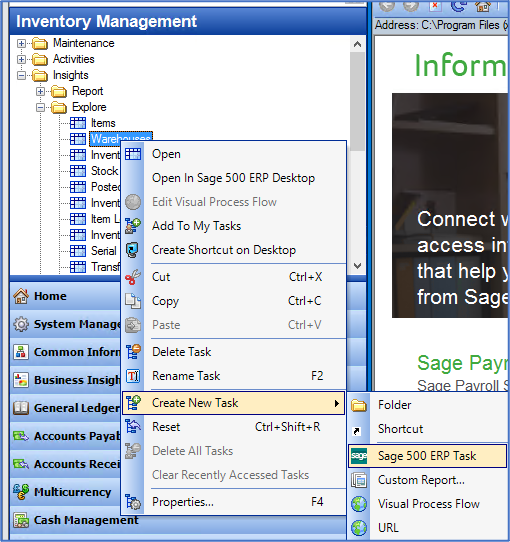
Note that there are other options at this step – you can create a link to a Custom Report, a Folder, or a URL as well.
- First consider if other users need to be able to launch/access the report when creating a link to a Custom Report. If so, make sure the .rpt file is saved on a shared drive, not your C: drive.
- When creating a link to a folder or individual document, same thing, make sure it’s saved on a shared drive if others need access to it. If you use a shared drive letter, make sure other users use the same drive letter for their share. Otherwise, the safest method to use is a UNC path name.
When selecting to create a new Sage 500 ERP Task, a new dialog box will appear. In order to point to your new BIE, it should be filled out as shown below.
- The “Module” dropdown should be set to “Business Insights – Explorer”, regardless of which module you are trying to add the task to. “Business Insights – Explorer” is the module that the task was assigned to in Task Editor, so that is where it will be found.
- Set the “Sage 500 Task” dropdown to your newly-created user-friendly task name.
- If needed, you can update the Task Name field – this is what will actually be displayed on the menu.
Note: The listing name under “Sage 500 Task”, which was defined in Task Editor, is the name/ID that the Security Groups function uses. If you need to adjust security permissions for your new task, it will be listed in the Security Groups function as it is in the “Sage 500 Task” dropdown.

Anything else I need to do after I’ve added my custom task to the Task Editor?
Yes, you need to save your new task to the menu so it’s available the next time you log in. Because you cannot add custom tasks to the Standard Sage menu, you must create or save to an existing custom menu.
- Already using a custom menu? After you add your custom task, when you close Sage, you will be asked if you want to save your Tasks menu as shown in the screenshot below. Answer Yes.
- If you’re currently on the Standard menu when you add your task, you will need to create a new custom menu when you close Sage.
- In either case, you can also save your new menu without closing Sage. Simply double-click on the lower right corner of your main Sage 500 screen (where it shows your menu name). In this example, I’m currently using the Standard Sage menu. So, I would double-click where it says “Standard”, right between the word “Production” (your license type) and your login name:
![]()
Whether you’re closing Sage or you’re saving your menu without closing, the next dialog box you will get will look like this:
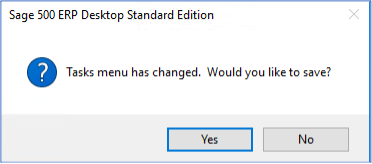
- If you’re already on a custom menu, after selecting Yes, you’re done – it has saved the new custom task to the existing custom menu.
- If you’re on the Standard menu, you will next be presented with this dialog box:
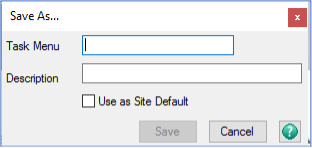
Here, enter a name for your new custom menu, along with a description. If you want your new custom menu to be the site default, click the available checkbox at the bottom before clicking Save.
And you’re done!
Contact us if you are interested in submitting a “how to” topic on using Sage 500, Sage X3, or Acumatica.